Prefazione
The charm of the waterfront is usually characterized by its calmness, but as every person who has ever dealt with a waterfront property is aware, water is never calm. A floating dock is a big investment- a gateway to recreation, a platform to trade and a bridge between the land and the water world. But its usefulness is all a matter of its stability. A dock that is not properly anchored is not just a nuisance, but a liability that may cause structural collapse, damage to property and even accidents.
Floating dock anchoring is a structural engineering and environmental evaluation exercise. It demands a compromise between the strict demands of the land-based construction and the flowing, unpredictable nature of the water. In order to make a dock a stable resource over decades, it is necessary to comprehend the forces involved, including wind, current, buoyancy, and friction, and deal with them using the right materials and techniques. A floating dock is like a ship without a crew, and unless it is anchored with care and forethought, it is at the mercy of the elements.
Che cos'è un bacino galleggiante?
Un pontile galleggiante è una piattaforma portatile e flessibile che poggia sull'acqua e la cui altezza varia con il livello dell'acqua. A differenza dei pontili fissi, che sono costruiti per essere installati sulla riva o sul fondo del mare, i pontili galleggianti sono costruiti per essere mobili con le correnti d'acqua e sono utilizzati con una passerella o una rampa con corrimano per la stabilità e una cerniera di collegamento per la rampa. Questi pontili sono anche realizzati per essere resistenti alla ruggine e alla corrosione, il che significa che sono una soluzione di lunga durata per l'accesso al molo.
I pontili galleggianti sono solitamente realizzati con materiali leggeri e robusti come alluminio, plastica o legno e vengono fatti galleggiare su materiali galleggianti come schiuma o fusti riempiti d'aria. Possono essere progettati in forme e dimensioni diverse a seconda del tipo di imbarcazioni e di attività acquatiche che si svolgeranno sul lungomare. Per evitare che il pontile galleggiante si allontani dalla riva, è necessario fissarlo adeguatamente con l'aiuto di un sistema di ancoraggio efficace, come il kit per pontili galleggianti che viene fornito con tavole, collegamenti rapidi e golfari.
I vantaggi di un corretto ancoraggio della banchina
Sono numerosi i vantaggi che derivano da un corretto ancoraggio di un pontile galleggiante per garantirne la stabilizzazione. Il primo vantaggio di avere un pontile ben ancorato è che diventa più stabile. Ciò significa che quando il pontile è fissato sul fondo dello specchio d'acqua, non può essere facilmente spostato o scosso dal vento, dalle onde o dalle imbarcazioni.
Un corretto ancoraggio svolge anche un ruolo cruciale nel proteggere il vostro pontile galleggiante da eventuali danni che possono essere inflitti dalle intemperie o dalle onde. Quando un pontile è ben fissato con un sistema di ancoraggio galleggiante, si trova in una buona posizione per contrastare le forze della natura, in modo da non essere danneggiato o trascinato via dalla riva. Inoltre, un molo ben fissato offre agli utenti un'area sicura in cui lavorare, riducendo così al minimo le possibilità di incidenti o di lesioni durante l'imbarco o lo sbarco dalle imbarcazioni.
What is the Impact of Weather and Changing Water Levels on the Anchoring Process?
Le condizioni meteorologiche e le variazioni del livello dell'acqua hanno una grande influenza sul processo di ancoraggio e sulla longevità del pontile galleggiante. Condizioni come venti forti, forti correnti e grandi onde possono aumentare la pressione sul sistema di ancoraggio, causando danni al pontile o addirittura spostandolo. Nelle regioni in cui gli uragani o le mareggiate sono frequenti, può essere necessario tirare il molo fuori dall'acqua o potenziare il sistema di ancoraggio durante questi periodi per avere un supporto.
Anchor reliability is also determined by the subaqueous substrate:
- Rock: Stable, but not penetrative; the only possible solution in this case is gravity-based deadweights.
- Sand: Screw-in augers are best suited to sand, which offers good suction and mechanical resistance.
- Silt/Muck: Offers low resistance; anchors in these loose bottoms are likely to creep and need broader bases or more weight.
Also, it is possible to leave extra chain length to allow the dock to rise and fall in case the water level changes. In the larger bodies of water, there may be a need to apply extra material like sufficient chain tension to ensure the dock remains anchored.
Quando si progetta il pontile, bisogna pensare alle condizioni meteorologiche e dell'acqua della propria regione, al tipo di ancoraggio più efficace di fronte a queste forze e al tipo di ancoraggio migliore, che si tratti di fori da uragano o di sistemi di ancoraggio rinforzati, e alla lunghezza di catena appropriata.
Regolamenti ambientali per l'ancoraggio delle banchine
Durante l'ancoraggio dei pontili galleggianti, esistono alcune leggi e norme ambientali che devono essere seguite per ridurre al minimo gli effetti sull'ambiente. Per quanto riguarda la conservazione dell'habitat, si dovrebbe evitare di posizionare le ancore e i pali di guida in modo da interferire con gli habitat acquatici e le zone di riproduzione dei pesci. Inoltre, anche il tipo di materiale utilizzato per la costruzione dei pontili e dei sistemi di ancoraggio, come il materiale per le decorazioni, deve essere ecologico per ridurre al minimo le possibilità di inquinamento delle acque da parte di materiali tossici.
In terms of legal compliance, in most jurisdictions, permits are required prior to the installation of anchors or piles on the public bottom land. These structures frequently have to be approved by agencies such as the Army Corps of Engineers (U.S.) or local maritime boards to make sure that they do not impede navigation or infringe on riparian rights. Consultation with local zoning offices is necessary at an early stage since illegal installations may lead to hefty fines or even removal.
Un altro fattore importante da considerare è la posizione di pontili e ancore che non devono interferire con i corsi d'acqua e possono essere potenzialmente pericolosi per gli utenti. Infine, bisogna considerare l'impatto delle strutture sulla linea di riva ed evitare di collocarle in aree che possono essere soggette a erosione o che contengono ambienti sensibili alla linea di riva.
The Best Anchoring System: 2-Step Decision Guide
The choice of an anchoring technique is a compromise between your water conditions and your dock material. Use this reasoning to get the safest arrangement of your project.
Step 1: Assess Your Environment
The mechanical logic of your anchors is determined by your water conditions.
- In Extreme Conditions and Tidal Zones: The gold standard is Piling Anchoring. When you have heavy wakes, high winds, or a continual rise and fall of water, you may have piles driven into the bed, and then you have a permanent, vertical track on which to run your dock. It is the most stable and it needs professional installation.
- For Deep Water (>30 ft): Deadweight & Chain is the industry standard. In cases where the water is too deep to allow piles, heavy concrete blocks (deadweights) rely on gravity and a crisscross chain pattern to offer lateral stability with no depth restrictions. In contrast to unstable straight-line systems, when the chains are crossed at 45 degrees to 60 degrees, the geometric tension is created to fix the position of the dock. The most important thing is to leave 5 percent to 10 percent of slack to allow the system to rise safely with the tides or surges without breaking hardware, and multi-point connections are used to distribute environmental loads to avoid overloading modular components.
- Narrow Channels and Seawalls: Stiff Arm/Seawall Mounts: These are similar to a mechanical tether. They are ideal in maintaining a dock at a constant distance in the river or canals so that it does not drift towards the bank.
- In the case of Calm, Shallow Ponds: Pipe and Sleeve is the most DIY-friendly. When the water is less than 10 feet and the bottom is soft, plain metal pipes pushed through sleeves are stable enough at a low cost.
The movement of the dock is determined by the water dynamics, but the bottom geology determines the final grip of your system. The compatibility of the geology of your site can be determined using the following matrix:
| Substrate Type | Recommended Anchoring Method | Mechanical Logic | Considerazioni chiave |
| Solid Rock / Bedrock | Deadweight (Gravity-based) | Relies purely on mass and friction. | May require 20%–30% additional weight to prevent sliding. |
| Sand / Firm Sediment | Helical Augers / Earth Anchors | Functions like a screw, utilizing mechanical tension and suction. | Often requires professional divers for deep-water installation. |
| Silt / Loose Muck | Deep Piling or Wide-Base Deadweight | Piles must reach a “bearing layer.” Weights need a wide footprint. | Anchors are prone to “creeping” under sustained wind loads. |
| Clay | Piles or Heavy Duty Augers | Clay provides excellent lateral support and high grip for threads. | Installation is labor-intensive; requires heavy-duty pile drivers. |
| Gravel / Cobble | Heavy Chain & Deadweight | Irregular surfaces help heavy blocks and chains to “catch.” | Augers are difficult to install as they may hit large stones. |
Step 2: Find the Match of the Method to Your Dock Material
Your dock is made of material and construction that will determine its ability to withstand the physical stress of anchoring. Various docks need varying degrees of support and flexibility.
- Banchine galleggianti in alluminio
Ancoraggio: Di solito è assicurato da palificazioni, bracci rigidi o ancore a peso morto. Si può fissare il pontile sul fondo dell'acqua conficcando le palafitte nel terreno. Un paio di bracci rigidi che si estendono dalla banchina alla riva impediscono il movimento laterale della banchina. Gli ancoraggi a peso morto si basano sulla massa di oggetti ingombranti (ad esempio, la banchina viene ancorata con l'aiuto di blocchi di cemento e altre strutture per mantenerla al suo posto.
- Pontili galleggianti in legno
A volte sono fissate con palafitte, catene di ancoraggio o cavi. Possono essere martellate sul fondo dell'acqua per garantire un buon sostegno alla banchina. Per evitare la deriva, la banchina viene ancorata alla riva o a pesanti ancore sul fondo dell'acqua mediante catene o cavi.
- Pontili galleggianti modulari in plastica
In genere viene ormeggiata con palafitte, catene o ancore a peso morto. Possono essere conficcate nel fondo dell'acqua per garantire al molo modulare una buona base e stabilità; il materiale utilizzato è la plastica. Possono collegare la banchina alla riva o ad ancore pesanti sul fondo dell'acqua. Le ancore a peso morto sono ancore che si affidano al peso dell'oggetto per evitare che la banchina galleggi.
- Banchine galleggianti in calcestruzzo
Di solito viene ormeggiato con palafitte o ancore a peso morto. Le palafitte in calcestruzzo possono essere conficcate nel fondo dell'acqua per garantire che la banchina abbia una base solida su cui poggiare. Le ancore a peso morto si basano sulla massa dei blocchi di cemento per mantenere la banchina in posizione e impedirne la deriva.
- Pontili galleggianti gonfiabili
A volte viene fissato con corde, catene di ancoraggio o piccole ancore. Il fissaggio può essere effettuato con corde o catene d'ancoraggio che aiutano a fissare il pontile gonfiabile ad alcune ancore sulla riva o sul fondo del corpo idrico. Piccole ancore (es. I mezzi di ancoraggio temporanei includono il lancio di oggetti (come un grappino o ancore a fungo) nell'acqua.
- Banchine galleggianti in tubo
In genere, viene ormeggiata con palificazioni, catene di ancoraggio o ancore di portata lorda. Le palafitte possono essere conficcate nel fondo dell'acqua per sostenere la banchina. Possono essere un collegamento diretto tra la banchina e la riva o ancore pesanti sul fondo dell'acqua. Le ancore a peso morto utilizzano pesi sotto forma di oggetti massicci per fissare la banchina.
The Ultimate Anchoring Decision Matrix
| Anchoring Method | Best Environment | Depth Suitability | Installation Type | Permitting & Environmental Impact | Winter / Ice Resilience | Maintenance Frequency | Best Material Match | Costo iniziale |
| Palificazione | High winds, waves, & heavy boat traffic | Up to 30 ft | Professional (Requires pile driver) | High complexity; permanent structure with sea-bed disturbance. | Poor; risk of “ice jacking” pulling piles out of the bed. | Very Low | Concrete, Wood, Aluminum | Alto |
| Deadweight & Chain | Deep water or rocky lakebeds | Unlimited | Moderate (Requires boat/barge) | Moderate/Low; considered temporary/mobile with minimal bed impact. | Excellent; chains can be slackened or removed to avoid ice damage. | Medium (Annual chain check) | HDPE Modular, Wood, Pipe Docks | Moderato |
| Stiff Arm / Seawall | Rivers, narrow channels, or steep shorelines | N/A (Shore-based) | Moderate (DIY possible) | Low; shore-based construction with negligible underwater impact. | Moderate; recommended to disconnect during heavy ice periods. | Basso | Aluminum, HDPE Modular | Moderato |
| Pipe & Sleeve | Calm, shallow ponds or private lakes | Under 10 ft | DIY Friendly | Very Low; non-permanent, lightweight, and usually permit-free. | Good; pipes are easily removed for winter storage. | Medium (Adjust for water levels) | HDPE Modular, Small Aluminum | Basso |
In order to choose the best anchoring, you should first analyze your surroundings. Professional piling should be used where there is maximum stability in high-traffic or tidal areas. In deep water (more than 30 feet), the best industry standard is deadweight and chain. A rigid arm is used in narrow channels to maintain accurate distance between the shore. The pipe and sleeve technique is a relatively inexpensive, do-it-yourself approach to shallow, calm ponds. Finally, the system should be matched to your dock material to guarantee the greatest life and the least structural stress.
The Materials Needed to Anchor a Floating Dock are Basic
The longevity of your floating dock depends on the selection of materials that are resistant to constant hydraulic forces and corrosive conditions. The following table will classify the key elements, including the foundation to the smallest safety joint, required to build a professional-grade anchoring system to assist you in planning your build.
| Categoria | Componente | Material & Specification | Best Use Case |
| Core Metal Materials | Base Metals | Hot-Dipped Galvanized (HDG), 316 Stainless Steel, Marine Aluminum | HDG for heavy chains; 316 SS for saltwater fasteners; Aluminum for structural frames. |
| Anchoring Foundations | Deadweights | Concrete Blocks | Traditional gravity-based anchoring for deep water. |
| Earth Anchors | Metal Augers / Helical Screws | High mechanical grip in sandy or muddy lakebeds. | |
| Piles | Steel Pipes or Timber Piles | Driven vertically for maximum permanent stability. | |
| Flexible Connectors | Anchoring Chain | Galvanized Chain | Uses weight to create “catenary tension,” acting as a natural buffer. |
| Wire Rope | Stainless Steel Cable | High tensile strength; must use with Thimbles to prevent fraying. | |
| Synthetic Rope | Nylon / Polypropylene | Lightweight or temporary mooring for small platforms. | |
| Tension & Adjustment | Winches | HDG or Stainless Steel | Used for initial setup and seasonal water level adjustments. |
| Shock Springs | Heavy-Duty Buffer Springs | Absorbs sudden kinetic energy from waves to protect the dock frame. | |
| Turnbuckles | HDG / Stainless Steel | Provides micro-adjustments to eliminate minor swaying or “slack.” | |
| System “Joints” | Shackles | HDG / 316 SS (Safety-Bolt type) | The primary link between anchors, chains, and the dock. |
| Chain Retainers | HDG Steel Slots | Mounted to the dock to lock and secure chains at specific lengths. | |
| Rigging Hardware | Thimbles & Crosby Clips | Protects cable eyes from friction and secures wire rope ends. | |
| Pile Guide Rollers | Polyurethane / Galvanized Steel | Essential for piling systems to allow smooth vertical tracking. |
An effective anchoring system must have a balance of strength, flexibility, and friction control. Whereas Concrete Deadweights or Piles serve as the structural root, the Galvanized Chain serves as the lung of the system, and its weight is used to absorb the wave energy. The 316 Stainless Steel is required to be used in shackles and fasteners in saltwater to avoid chloride pitting. Lastly, the “joints” like Pile Guide Rollers and Thimbles are essential in minimizing mechanical friction. In the absence of these protection accessories, the water movement would ultimately cut through cables and erode brackets causing the system to break down.
Come ancorare un pontile galleggiante?
The repair of a floating dock is a complicated process that involves a number of steps to ensure a solid base.
- Valutare il sito: Per cominciare, valutate il luogo in cui intendete collocare il vostro pontile galleggiante. Alcuni fattori sono la profondità dell'acqua, il tipo di fondale, se sabbioso, fangoso o roccioso e il grado di esposizione a venti e onde. Queste informazioni vi aiuteranno a determinare il sistema di ancoraggio più adatto al vostro sito.
- Selezionare il sistema di ancoraggio: In questo caso, si deve considerare la valutazione del sito e selezionare il sistema di ancoraggio più adatto al caso in questione. Scegliere il tipo di ancoraggio e la linea di ancoraggio corretti, in grado di fornire la capacità di tenuta e la stabilità necessarie per il vostro pontile galleggiante.
- Raccogliere strumenti e materiali: Raccogliere tutti gli strumenti e i materiali necessari per l'ancoraggio della struttura. Questi possono includere ancore, cime di ancoraggio, grilli, ditali, argani e qualsiasi altro hardware necessario a seconda del tipo di sistema di ancoraggio.
- Preparare il bacino: Prima di procedere all'ancoraggio, assicuratevi che il pontile galleggiante sia ben costruito e posizionato nel punto giusto. Controllare che tutte le giunzioni delle sezioni del pontile siano ben fissate e che il pontile sia ben posizionato sul terreno.
- Segnare i punti di ancoraggio: A seconda delle dimensioni e della forma del molo, è necessario stabilire dove posizionare le ancore. Questi punti devono essere segnalati con boe o qualsiasi altra struttura temporanea che aiuti ad ancorare la struttura.
- Posizionare gli ancoraggi: In questo caso, è necessario un'imbarcazione o qualsiasi altro mezzo per trasportare le ancore nelle aree prestabilite. Abbassare lentamente le ancore sul fondo e assicurarsi che siano posizionate correttamente e ben incastrate nel sedimento. Per le ancore a palo, le ancore devono essere martellate nel fondale marino o nel fondo del lago con gli strumenti appropriati.
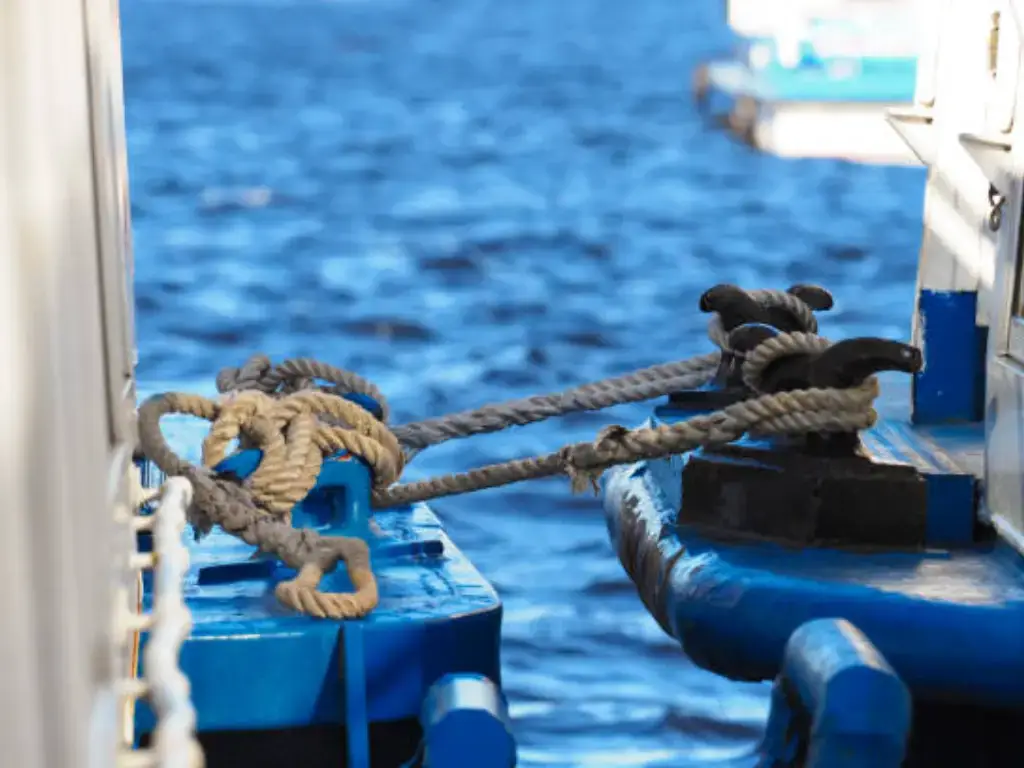
- Installare gli ancoraggi: Una volta posizionati gli ancoraggi, fissare le cime di ancoraggio agli ancoraggi utilizzando grilli o qualsiasi altro collegamento adeguato. Assicurarsi che i collegamenti siano eseguiti correttamente e fissati in modo da non poter essere facilmente scollegati o scossi.
- Fissare i cavi di ancoraggio alla banchina: Le cime di ancoraggio devono essere tirate verso il pontile galleggiante e legate nei punti giusti, come le gallocce o i golfari. Per evitare l'usura delle cime, è necessario utilizzare dei ditali e assicurarsi che il carico sia distribuito in modo uniforme.
- Fissare la banchina agli ancoraggi: Rilasciare la tensione delle cime di ancoraggio utilizzando gli argani o altri dispositivi progettati a tale scopo. Le cime devono essere tese a un livello tale che il molo non si muova molto, ma allo stesso tempo non devono essere troppo tese in modo che il molo o le ancore siano sottoposte a uno stress eccessivo.
- Prova di stabilità: Una volta che l'imbarcazione si è ancorata, assicurarsi che i galleggianti siano saldi esercitando una pressione sul pontile galleggiante. Assicurarsi che il pontile sia ben ancorato e stabile in modo da non vibrare durante l'uso.
Technical Deep Dive: Calculating Anchor Scope Ratio
To ensure a floating dock stays secure during surges, it is critical to use the correct Scope Ratio—the mathematical relationship between the length of your anchor line and the total vertical distance it must cover.
The Anchor Length Formula
Use the following formula to determine the minimum length needed for each individual anchoring line:

- L: Required length of the anchor rode (chain or rope).
- Dmax: The maximum water depth at high tide or peak reservoir levels.
- Hwave: The maximum predicted wave height during storm conditions.
- C: The Scope Coefficient (determined by your material choice).
Standard Scope Coefficients (C)
The coefficient varies based on the weight and elasticity of the materials. Heavier materials create a “catenary curve” that acts as a natural shock absorber.
| Rode Material | Recommended Ratio (C) | Functional Logic |
| All-Chain (Galvanized) | 3:1 | The heavy weight keeps the pull on the anchor horizontal, ensuring it stays bedded. |
| Hybrid (Chain + Rope) | 5:1 | Requires more length to ensure the angle of pull remains low for the lighter rope section. |
| All-Rope (Nylon/Poly) | 7:1 | Necessary for lightweight docks to compensate for the lack of weight in the line. |
Strategic scope management effectively minimizes vertical load and hardware fatigue. A common mistake is using a ratio that is too tight (e.g., 1:1). When water levels rise or a large wave hits, a tight line forces the dock to pull directly upward on the anchor, which can snap shackles or drag heavy concrete blocks out of position. By maintaining a 3:1 or 5:1 ratio, the “slack” in the chain allows the dock to lift vertically with the water while the horizontal force on the anchor remains minimal, preventing drift.
Practical Noise, Ice and Water Level Management Solutions
In order to offer a more enjoyable experience to dock owners and guarantee the long-term functionality, it is necessary to address the maintenance and environmental issues. The following is a technical, clear breakdown of solutions to noise, ice, water levels and ecological protection.
Silent Anchoring: How to Eliminate Chain Squeaking
High-frequency metal-on-metal friction causes the shrill sound of metal chains rubbing against steel brackets. To remove this, place polyethylene (PE) bushings or heavy-duty rubber gaskets at the point where the chain enters the chain retainer of the dock. These materials serve as a vibration-damping buffer, which provides a silent waterfront environment without affecting the security of the connection.
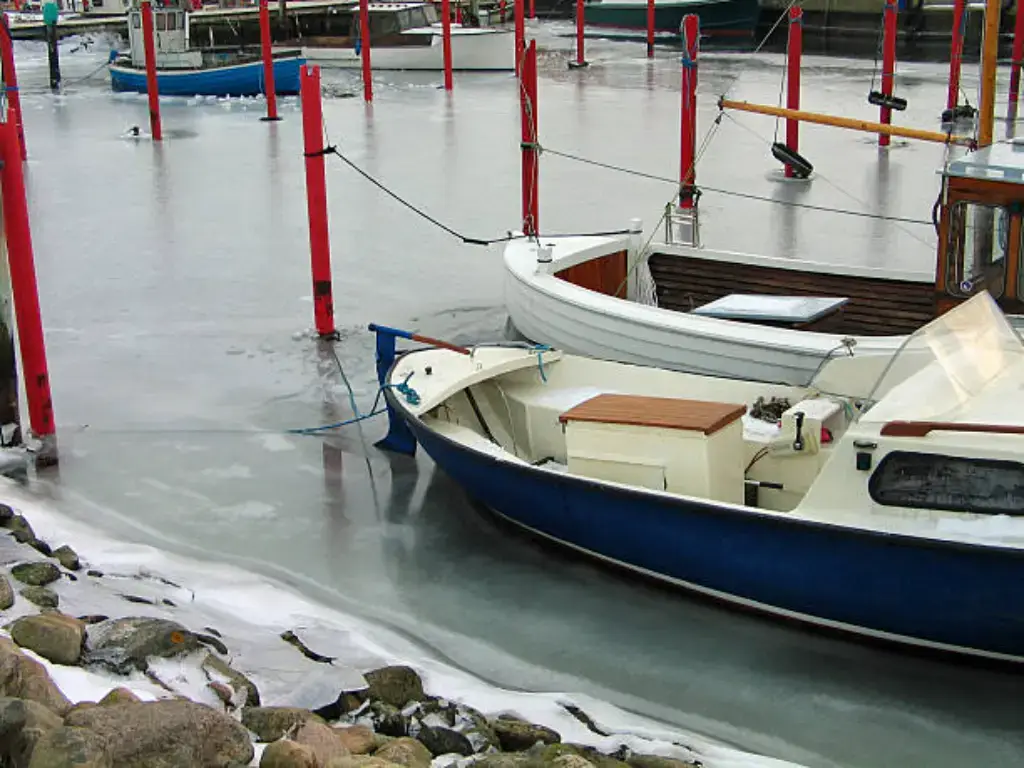
Winter Protection: Ice Heave
In colder climates, the growing ice forms ice heave, which is strong enough to lift concrete anchors or bend steel pilings. The chain tension should be loosened before the water freezes to allow the dock to ride on the ice surface to avoid structural failure. In permanent installations, de-icers or bubblers are installed around anchoring points to keep a circle of open water circulating by pumping warmer bottom water, so that ice does not cling to the structure.
Auto-Tensioning of Frequent Water Level Change
The daily tidal variations or reservoir variations usually necessitate manual chain adjustments which are labor intensive. An automated alternative is a counterweight pulley system that maintains constant tension with a heavy weight. When the water is high the pulley maintains the chains taut and when it is low the weight takes the slack, so that the dock is steady and in line without requiring daily attention.
Green Anchoring: Reducing Lakebed Effect
Conventional massive anchors are able to destroy fragile seagrass beds and aquatic environments. Helical screw anchors (augers) should be used instead of large concrete blocks in order to reduce environmental impact. Augers offer huge holding capacity and a footprint of just a few inches, which causes minimal disturbance to the lakebed. Moreover, the local ecosystem is preserved by strategic positioning of anchor arrays to prevent sensitive no-mow areas.
Longevity Guide: Maintenance and Troubleshooting
An anchoring system is a moving mechanical system that needs active maintenance to resist the elements. To be stable in the long run, follow these guidelines:
- The Annual Underwater Inspection: Once a year, do a comprehensive inspection of the shackles and the first five feet of chain close to the lakebed. It is here that the most aggressive corrosion is produced by high-chloride environments and friction of the sediment. In case of low visibility, a commercial diver is advisable in deep-water installations.
- Chain Tension: When you find your dock starting to lean or to go off center, it is a good indication that there is an uneven tension. Re-balance the load with turnbuckles or tighten/loosen the anchor lines by hand. Correct alignment eliminates structural stress on the dock frame as the water levels vary.
- The 20 Percent Rule of Replacement: Check all hardware, such as chains, anchors, and connectors, to see whether they are structurally thin. When any chain link has lost over 20 percent of its original diameter through rust or wear, it has reached its critical failure point. These parts should be replaced as soon as possible to prevent a disastrous failure in the event of a storm.
- Post-Storm Audits: Check the tension and positioning quickly after heavy weather or high-traffic weekends. Early detection of a loose shackle or a slightly displaced anchor can save the expensive price of an entire system reformat.
Although hardware maintenance is a requirement, a robust Hisea Dock is created to collaborate with your anchoring system to ensure long-term stability.
How to Anchor a Floating Dock to be As Reliable As Possible: Hisea Dock Engineering Standard
The anchoring requires a platform that is capable of sustaining the physical forces that it is anchored to. Hisea Dock has been involved in high-performance modular systems since 2006, which are meant to operate in synergy with these technical requirements. Our modules are designed to absorb the energy of waves instead of reflecting them, which is why they are made of a new generation of HDPE with high UV additives, and this will greatly decrease the dynamic load on your chains and anchors.
Our design is based on structural integrity. Hisea Dock has 19mm-thick reinforced connection ears and has been extensively tested to withstand diagonal tension to 14,389 N. This makes sure that your anchor points are safe even when there is a heavy surge or even when it is freezing in winter- our special buoyancy design will enable the dock to be safely floating on top of the ice.
In addition to the hardware, we also offer tailored anchoring plans and complete installation instructions to remove guesswork. Hisea Dock has a 5-year warranty and lasts 20-30 years longer than the industry average, making the complex task of anchoring a sure, low-maintenance solution to any waterfront.
Cost Comparison: DIY Budget and Professional Installation
Anchoring costs will give you a clear picture of how to plan your budget and at the same time make sure that your floating dock is safe in the long run. The next breakdown separates the hardware needs and the logistical cost of installation.
Material Cost Breakdown
Regardless of the method of installation, high-quality, marine-grade hardware is necessary. The following table is an estimation of the total investment of a typical anchoring arrangement.
| Item | Specification | Unit Price (USD) | Qty (Standard Setup) | Total Estimated Cost |
| Anchors | 500 – 1,000 lbs Concrete Blocks | $150 – $500 | 2 – 4 units | $300 – $2,000 |
| Anchoring Chain | 3/8″ or 1/2″ G43 Galvanized | $7 – $15 / ft | 100 – 200 ft | $700 – $3,000 |
| Rope/Cables | Marine-grade Nylon/Polyester | $2 – $5 / ft | 50 – 100 ft | $100 – $500 |
| Hardware Kit | Shackles, Swivels, Thimbles | $200 – $600 | 1 full set | $200 – $600 |
| SUBTOTAL | Hardware Only | $1,300 – $6,100 |
Installation Costs: DIY vs. Professional Installation
The main price variation is the equipment and specialized labor needed to position heavy anchors on the seabed correctly.
| Cost Category | DIY Installation (Budget) | Professional Installation (Full Service) |
| Equipment Rental | Small barge/pontoon: $300 – $700 | Crane Barge / Workboat: Included |
| Labor & Expertise | $0 (Requires 3+ strong workers) | Commercial Divers & Crew: $1,500 – $5,000 |
| Technical Verification | Manual depth sounding / visual | Sonar & Underwater Video: Included |
| Permits & Fees | Owner-handled: $100 – $500 | Contractor-handled: $100 – $500 |
| TOTAL LABOR COST | $400 – $1,200 | $1,600 – $5,500+ |
ROI Advice: Why Professional Installation is Cost-Saving
Although the initial expense of employing a team is greater, professional installation can be more economical in the long-term use of the dock, particularly in harsh conditions.
- Accuracy and Consistency: DIY installations are prone to the problem of Anchor Drift, where anchors are deposited out of position because of water currents. A professional crane barge means that the placement is accurate and the tension is not uneven, which may cause the dock frames to be warped or the brackets to snap in the storm.
- Checking of the Seabed: Professional divers check that anchors are not lying on unstable ledges or are buried too deep in the “sugar sand” or muck. An overturned anchor may cause more than 10,000 dollars in emergency repairs to the dock.
- Deep Water Safety: It is unsafe to work with 1,000 lb blocks and heavy steel chains without hydraulic winches. The risk of property damage and injury is also reduced by professional teams, which is a crucial factor in insurance liability.
- Long-Term Durability: A professionally adjusted system minimizes friction on shackles and chains. This set it and forget it strategy normally increases the maintenance cycle of every 2 years to every 5-10 years.
In the case of a small dock in shallow calm lake water, DIY is a cost-effective alternative. Nevertheless, in the case of deep water, high-traffic, or high-storm-prone areas, a professional team offers a certain degree of security that is self-paying in terms of maintenance and asset protection.
Conclusione
Floating dock anchoring is an investment in your future waterfront property. With the proper methodology, be it the strong stability of pilings or the adaptable crisscross chain design, and the use of superior materials such as the ones offered by Hisea Dock, you turn a mere platform into a permanent maritime structure.
The key to success in this venture lies in the convergence of high grade HDPE engineering and rigorous installation habits. When you purchase a system that is UV-resistant, impact-resistant and has a 5-year warranty, you are not purchasing a dock, you are purchasing peace of mind.
FAQS
Q: What to do to stabilize a floating dock?
A: A floating dock is anchored by a mixture of vertical piles, heavy weight anchor chains, or stiff arm systems to limit the lateral movement but allow the dock to rise and fall with the water level. Swaying and tilting is also greatly minimized by increasing the surface area by joining several modules and maintaining adequate tension in the anchoring lines.
Q: What is the weight to anchor a floating dock?
A: Standard residential docks have a required weight of between 500 and 1,000 lbs (225 and 450 kg) per anchor point. The precise amount is determined by the square footage of the dock, the maximum local wind speed, and the current of the water; a rule of thumb is to have sufficient weight to match the calculated maximum lateral force caused by the environmental factors, which is 1.5 to 2 times.
Q: What is the 7:1 anchor rule?
A: The anchor scope is the ratio of the length of the anchor line (rode) to the vertical distance between the bottom and the bow of the boat, and is denoted as the 7:1 rule. To every 1 foot of water depth (and the distance between the water and the deck) you must release 7 feet of line, so that the anchor is drawn horizontally, and it will cut into the seabed.
Q: What side of the boat do you never anchor?
A: You must never row a boat at the stern (the back). The stern anchoring is risky since the rear of the boat is normally heavier with the engine and lower transom, when waves or current strike the stern, it is easy to swamp the boat and the boat capsizes or sinks very fast.