วิธีสร้างท่าเรือลอยน้ำที่ใช้งานได้นานกว่า 20 ปี: แผนงานขั้นสูงสุด
การสร้างท่าเทียบเรือลอยน้ำ ต้องการมากกว่าการตอกตะปูไม้เพียงอย่างเดียว ไม่ว่าจะเป็นการสร้างท่าเรือลอยน้ำเชิงพาณิชย์หรือแพลตฟอร์มส่วนตัว ความสำเร็จขึ้นอยู่กับความรู้ด้านฟิสิกส์และวิทยาศาสตร์วัสดุ ในคู่มือนี้ เราจะตัดคำแนะนำแบบมือสมัครเล่นออกไป เพื่อมอบพิมพ์เขียวทางวิศวกรรมที่สมบูรณ์แบบสำหรับใช้งานยาวนาน 20 ปี
ฟิสิกส์ของการลอยตัว: การคำนวณแรงลอยตัวก่อนที่คุณจะสร้าง
ความผิดพลาดที่ร้ายแรงที่สุดในการก่อสร้างทางทะเลคือการสมมติว่าการผูกไม้เข้าด้วยกันจะทำให้ได้แพลตฟอร์มที่มั่นคง ก่อนที่จะดูแผนการสร้างท่าเรือลอยน้ำ คุณต้องเข้าใจการต่อสู้ระหว่างแรงโน้มถ่วงและการแทนที่ เป้าหมายหลักของคุณคือการรักษา "ฟรีบอร์ด" ที่เหมาะสม—ระยะห่างระหว่างระดับน้ำกับด้านบนของดาดฟ้าของคุณ
การทำความเข้าใจการคำนวณน้ำหนักคงที่กับน้ำหนักใช้งาน
ในการคำนวณว่าคุณต้องการอุปกรณ์ลอยน้ำมากเพียงใด คุณต้องชั่งน้ำหนักท่าเรือของคุณก่อน น้ำหนักคงที่คือน้ำหนักรวมของไม้ อุปกรณ์ฮาร์ดแวร์ และตัวอุปกรณ์ลอยน้ำเอง น้ำหนักแปรผันคือน้ำหนักที่เปลี่ยนแปลงได้ เช่น คน เฟอร์นิเจอร์ และอุปกรณ์ต่างๆ
สูตรการลอยตัว: ปริมาตรที่จมอยู่ใต้น้ำที่ต้องการ = (น้ำหนักบรรทุกคงที่ + น้ำหนักบรรทุกใช้งาน) ÷ 62.4 ปอนด์ (น้ำหนักของน้ำจืด 1 ลูกบาศก์ฟุต)
ตัวอย่างสำหรับท่าเทียบเรือขนาด 8×12 ฟุต (96 ตารางฟุต): หากโครงไม้และพื้นไม้ของคุณมีน้ำหนัก 1,000 ปอนด์ (น้ำหนักคงที่) และคุณต้องการรองรับน้ำหนักคน/อุปกรณ์ 30 ปอนด์/ตารางฟุต (น้ำหนักบรรทุก 2,880 ปอนด์) น้ำหนักรวมทั้งหมดคือ 3,880 ปอนด์คุณจะต้องใช้ทุ่นที่สามารถแทนที่น้ำได้ไม่น้อยกว่า 62.2 ลูกบาศก์ฟุต เพื่อให้ดาดฟ้าอยู่เหนือน้ำเพียงเล็กน้อยเท่านั้น ควรคำนึงถึงระยะเผื่อความปลอดภัยเพื่อรักษาระยะว่างระหว่างดาดฟ้าถึงขอบเรือที่ 12-16 นิ้ว
→ เกลียดคณิตศาสตร์? ข้ามการคำนวณและดูการกำหนดค่าของลอยตัวหนักของเรา ↓
| วัสดุสำหรับพื้นระเบียง | น้ำหนักโดยประมาณ (ปอนด์/ตารางฟุต) | ผลกระทบต่อความต้องการในการลอยตัว |
|---|---|---|
| ซีดาร์ / ไม้สนอบสารเคมี | 3.0 – 4.5 ปอนด์ | ปานกลาง; ต้องการการกระจายตัวของฟลอทตามมาตรฐาน |
| พื้นระเบียงไม้คอมโพสิต | 4.5 – 5.5+ ปอนด์ | หนัก; ต้องการความจุการลอยตัวเพิ่มอีก 20-30% |
การเลือกอุปกรณ์ลอยตัวที่เหมาะสม: ถังไม้ vs. อุปกรณ์ลอยตัวที่ออกแบบเฉพาะ
อินเทอร์เน็ตเต็มไปด้วยบทเรียนเกี่ยวกับการสร้างท่าเรือลอยน้ำด้วยถังขนาด 55 แกลลอน แม้ว่าการสร้างท่าเรือลอยน้ำด้วยถังอาจดูเหมือนเป็นวิธีประหยัดเงินที่ดี แต่มันเป็นกับดักที่ร้ายแรง การสร้างท่าเรือลอยน้ำด้วยถังพลาสติกนั้นละเลยความจริงที่สำคัญ: ถังสีฟ้าแบบมาตรฐานไม่ได้ถูกออกแบบมาสำหรับน้ำในฤดูหนาว
เมื่อประเมินความเสี่ยงของการล้มเหลว คุณต้องแยกแยะระหว่างแรงดันน้ำแข็ง (แรงกดทับจากผิวน้ำแข็งของทะเลสาบที่กระทำต่อผนังถัง) กับการขยายตัวจากการแข็งตัวภายใน (เมื่อรอยแตกขนาดเล็กไมโครสโคปิกทำให้มีน้ำซึมเข้าไปในถัง และน้ำแข็งตัวจนทำให้ถังแตกจากภายใน) นอกจากนี้ การก่อสร้างท่าเรือลอยน้ำโดยใช้ถังพลาสติกหรือแม้กระทั่งการก่อสร้างท่าเรือลอยน้ำโดยใช้โฟมสไตโรโฟม ก็ถูกห้ามโดยหน่วยงานด้านสิ่งแวดล้อมมากขึ้น เนื่องจากปัญหาการหลุดร่วงของไมโครพลาสติกและความไม่น่าเชื่อถือทางโครงสร้าง
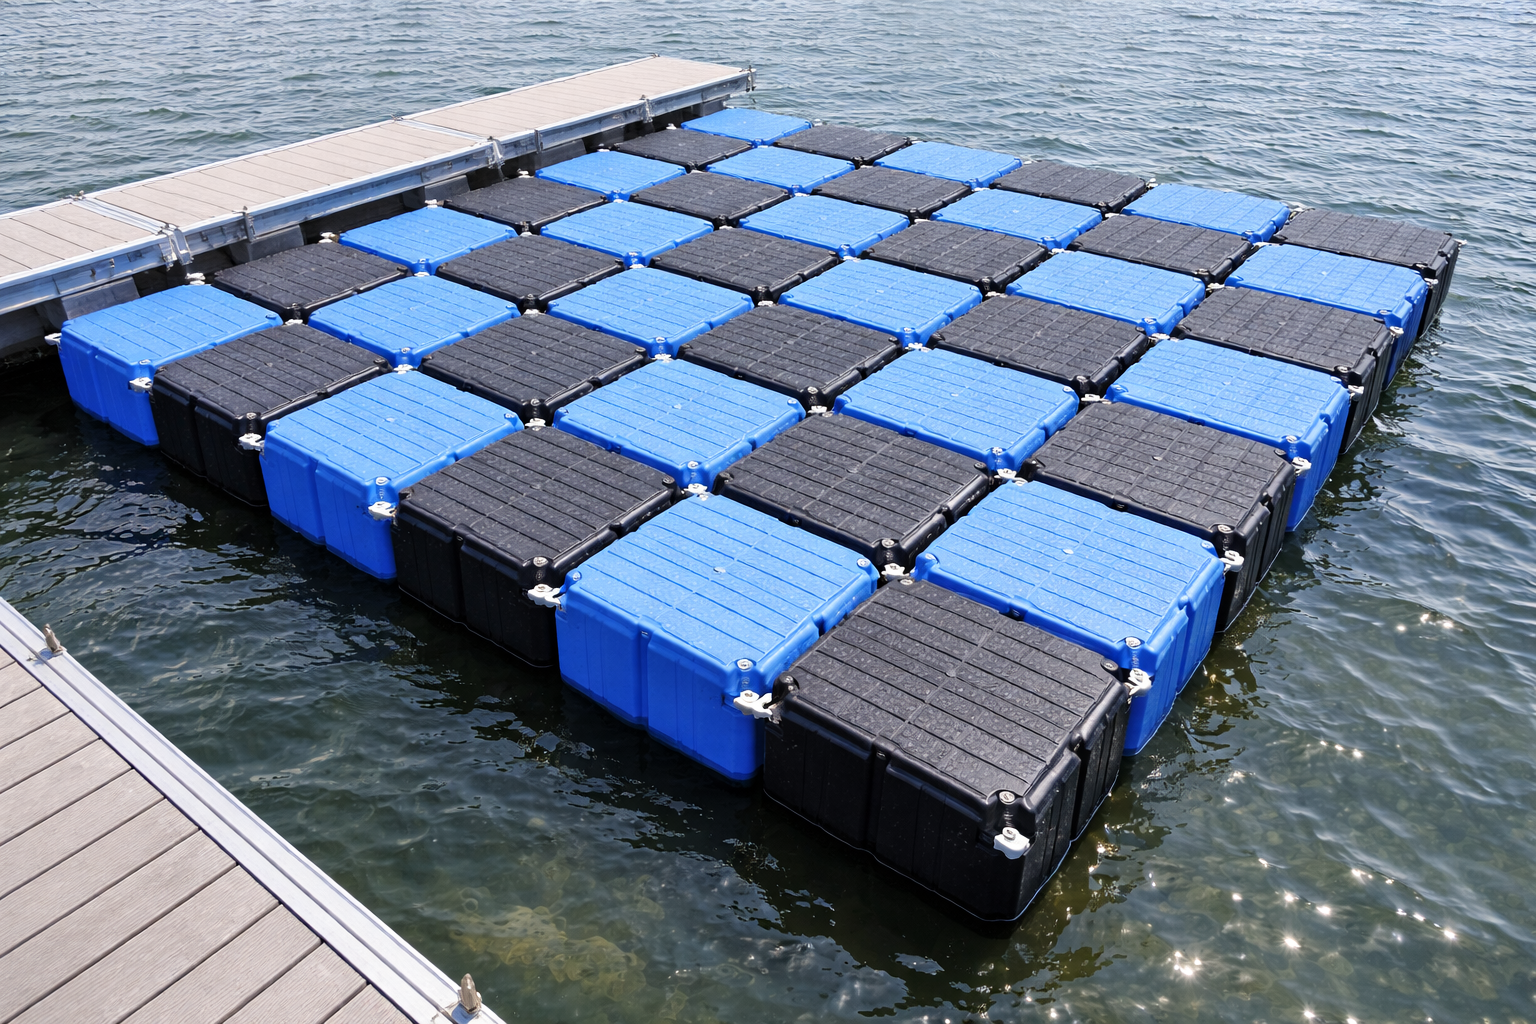
การอัปเกรดทางวิศวกรรมคือการใช้ทุ่นลอยที่ทำจาก HDPE ที่มีน้ำหนักโมเลกุลสูง (High Molecular Weight HDPE) ซึ่งผลิตโดยวิธีการเป่าขึ้นรูป (blow-molded) เพื่อกำจัดรอยต่อและจุดที่มีความเค้น (stress points) ทำให้มีความสามารถในการรับน้ำหนักได้มหาศาล (สูงถึง 350 กิโลกรัมต่อตารางเมตร) เมื่อทำการอัปเกรด คุณต้องเข้าใจความแตกต่างที่สำคัญของอุตสาหกรรมนี้: ทุ่นลอยน้ำแบบกลวง vs. แบบเติมโฟม. ในขณะที่แผ่นลอย HDPE ชนิดกลวงคุณภาพสูงเหมาะสำหรับสภาพแวดล้อมที่ควบคุมได้ แผ่นลอยที่เติมโฟม EPS (Expanded Polystyrene) เป็นตัวเลือกที่ปลอดภัยที่สุด แม้ในกรณีที่เกิดการเจาะทะลุอย่างรุนแรงจากเศษซากที่จมอยู่ใต้น้ำหรือการชนจากใบพัด แผ่นลอยที่เติมโฟมจะไม่สูญเสียความสามารถในการลอยตัวหรือจมลง
การเลือกวัสดุ: เหตุผลที่ฮาร์ดแวร์เกรดทางทะเลเป็นสิ่งที่ไม่สามารถต่อรองได้
ไม่ว่าคุณจะกำลังสร้างท่าเรือลอยน้ำบนทะเลสาบหรือท่าเรือลอยน้ำบนแม่น้ำ น้ำคือตัวทำละลายที่ยิ่งใหญ่ที่สุดของธรรมชาติ การใช้ฮาร์ดแวร์ชุบสังกะสีมาตรฐานจากร้านฮาร์ดแวร์ในท้องถิ่นเป็นเหมือนการลงโทษประหารชีวิตสำหรับโครงสร้างของคุณอย่างแน่นอน
| สิ่งแวดล้อมทางน้ำ | สเปคฮาร์ดแวร์ที่แนะนำ | อายุขัยเฉลี่ย |
|---|---|---|
| น้ำจืด (ทะเลสาบ/บ่อ) | ชุบสังกะสีแบบจุ่มร้อน (ASTM A153) | 15 – 20 ปี |
| น้ำกร่อย / แม่น้ำที่มีกระแสน้ำไหล | เหล็กชุบสังกะสีแบบจุ่มร้อนสำหรับงานหนัก | 10 – 15 ปี |
| น้ำเค็ม (ชายฝั่ง) | สแตนเลสเกรดทางทะเล 316 | 20+ ปี |
โครงสร้างพื้นฐาน: การวิศวกรรมโครงสร้างที่แข็งแรง
ท่าเรือที่ส่งเสียงเอี๊ยดและบิดเบี้ยวเมื่อเรือแล่นผ่านเป็นท่าเรือที่กำลังเสื่อมสภาพอย่างชัดเจน แม้ว่าคุณจะกำลังสร้างท่าเรือลอยน้ำขนาดเล็กก็ตาม ความแข็งแรงในการบิดงอเป็นสิ่งสำคัญอย่างยิ่ง
เทคนิคการใช้คานคู่เพื่อเสริมความแข็งแรงรอบขอบเขต
กรอบที่มืออาชีพทำจะทำงานเหมือนกล่องบิดตัว อย่าพึ่งพาไม้ขนาด 2×8 เพียงอันเดียวสำหรับขอบนอกของคุณ การเพิ่มไม้รองขอบนอกเป็นสองเท่าและยึดด้วยน็อตมาตรฐานทางทะเล สลักเกลียวคาร์ริดจ์ขนาด 1/2 นิ้ว พร้อมแหวนรองแบบหนา ลดการบิดงอได้อย่างมากโดยไม่กระทบต่อความแข็งแรงของไม้ คุณต้องติดตั้งขาเหล็กมุมนอกที่แข็งแรงทนทานด้วย
รูปแบบการเว้นระยะของสายและจุดยึดลอยตัว
ควรเว้นระยะระหว่างเส้นขวางภายใน 16 นิ้ว โอซี (On Center) สำหรับพื้นไม้แบบดั้งเดิม อย่างไรก็ตาม หากคุณใช้พื้นไม้สังเคราะห์ที่มีน้ำหนักมากกว่า ระยะห่างของคานรองต้องลดลงอย่างเคร่งครัดเหลือ 12 นิ้วต่อระยะกลาง (OC) เพื่อป้องกันไม่ให้แผ่นไม้โค้งงอเมื่อโดนแสงแดดในฤดูร้อน
เมื่อติดตั้งทุ่นลอยตัว ห้ามจัดกลุ่มไว้ตรงกลางเด็ดขาด ให้ใช้แบบเกรดสำหรับงานทางทะเล สลักเกลียวผ่านพร้อมน็อตล็อคไนลอน และแหวนรองขนาดใหญ่พิเศษสำหรับงานหนัก ห้ามใช้สกรูเกลียวปล่อยกับทุ่นลอยโดยเด็ดขาด เนื่องจากการสั่นสะเทือนเป็นจังหวะจะทำให้เกลียวไม้หลุดและทำให้ทุ่นลอยหลุดออกมาได้
การประกอบทีละขั้นตอน: จากชายฝั่งสู่ผืนน้ำ
การเคลื่อนย้ายโครงสร้างไม้หนัก 600 ปอนด์ลงสู่น้ำต้องใช้กลยุทธ์ การสร้างท่าเรือลอยน้ำด้วยทุ่นลอยต้องอาศัยลำดับขั้นตอนอย่างรอบคอบ
- การวัดและการจัดกรอบ: ตัดไม้ขอบรอบและไม้ค้ำยันภายในให้พอดีอย่างแม่นยำ วางไม้ทั้งหมดคว่ำลงบนชายฝั่งที่เรียบ วางไม้ค้ำยันให้ตรงตำแหน่ง (16 นิ้ว หรือ 12 นิ้ว OC) และตรวจสอบให้ทุกมุมเป็นฉากก่อนที่จะยึดด้วยสลักเกลียว
- ติดตั้งอุปกรณ์ลอยตัว: ติดตั้งอุปกรณ์ลอยตัวที่ออกแบบไว้กับคานขวางโดยใช้สลักเกลียวทะลุและน็อตล็อคไนลอน ในขณะที่โครงยังคว่ำอยู่
- การพลิกและกลิ้ง: ใช้ผู้ช่วยที่มีความสามารถอย่างน้อยสามคน (หรือรอก) พลิกท่าเรือขึ้นด้านขวาอย่างระมัดระวัง ใช้ท่อ PVC ชนิดหนาเป็นลูกกลิ้งใต้ท่าเรือ
- พื้นไม้บนผิวน้ำ: ลอยโครงเปล่าออกไป ติดตั้งสมอชั่วคราว แล้วขันยึดแผ่นพื้นไม้ลงไปในขณะที่โครงยังอยู่ในน้ำ
ระบบยึด: รักษาการลงทุนของคุณให้มั่นคง
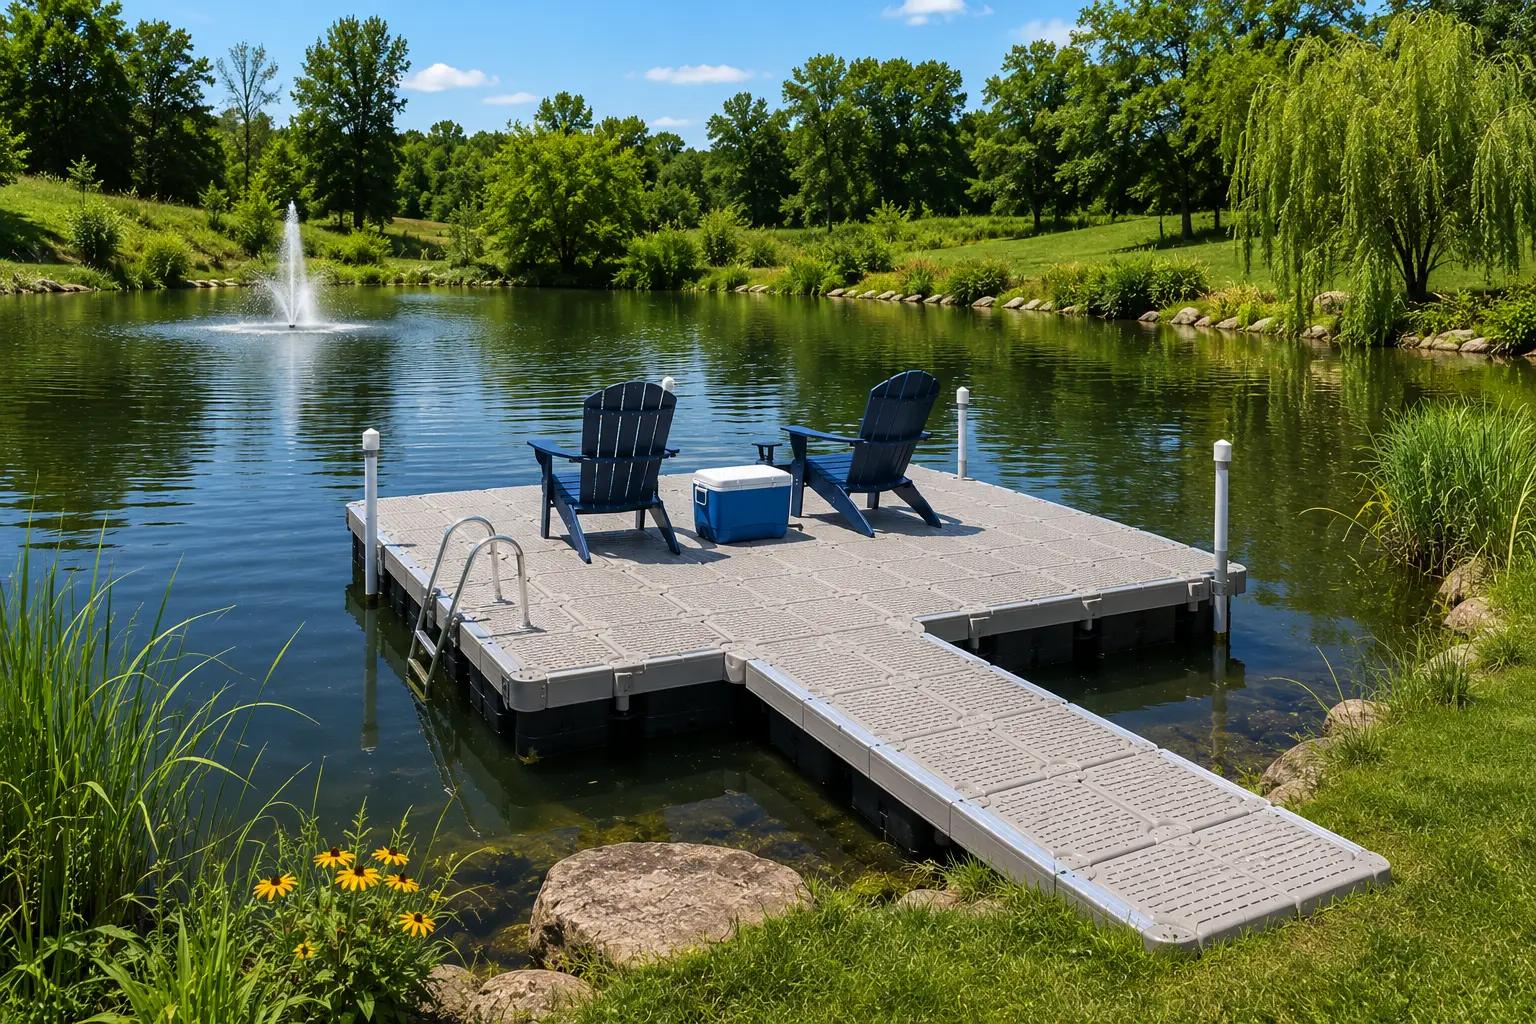
หากคุณกำลังสร้างท่าเทียบเรือลอยน้ำบนบ่อ อาจใช้เพียงน้ำหนักถ่วงแบบง่ายก็เพียงพอ แต่บนทะเลสาบหรือแม่น้ำเปิด การยึดตรึงเป็นงานวิศวกรรมที่ซับซ้อน
ปลอกเสาเข็ม vs. หลักยึดน้ำหนักถ่วงคอนกรีต
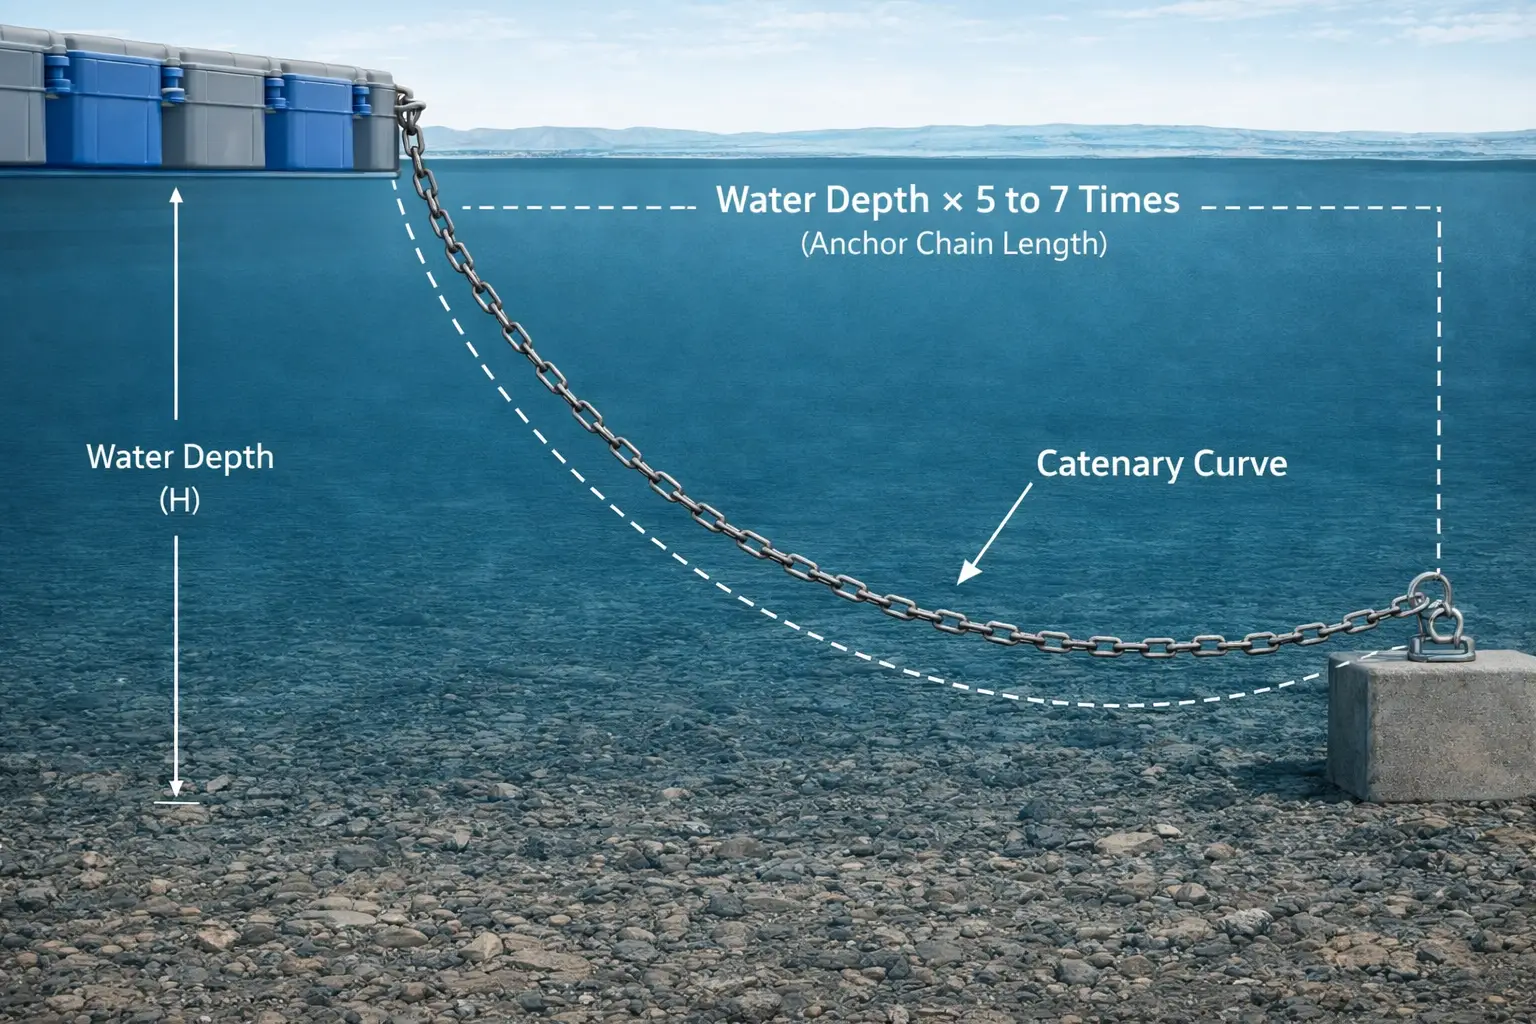
หากการตอกเสาเข็มเป็นไปไม่ได้ จะต้องใช้ตุ้มน้ำหนักคอนกรีตแทน อย่างไรก็ตาม คุณต้องคำนึงถึงแรงลอยตัว: คอนกรีตจะสูญเสียน้ำหนักที่มีผลประมาณ 45% เมื่อจมอยู่ใต้น้ำ กฎทางวิศวกรรมที่ใช้กันทั่วไปคือคำนวณให้มีน้ำหนักขั้นต่ำของ 4-5 ปอนด์ น้ำหนักแห้งของคอนกรีตต่อหนึ่งตารางฟุตของพื้นผิวท่าเรือ นอกจากนี้ คุณต้องคำนวณการแขวนของโซ่สมอให้ถูกต้อง: ความยาวของโซ่ต้องเป็น 5 ถึง 7 เท่าของความลึกน้ำสูงสุดเพื่อทำหน้าที่เป็นตัวดูดซับแรงกระแทก
การเชื่อมต่อชายฝั่ง: ทางเดินขึ้นลงเรือและไม้ค้ำยัน
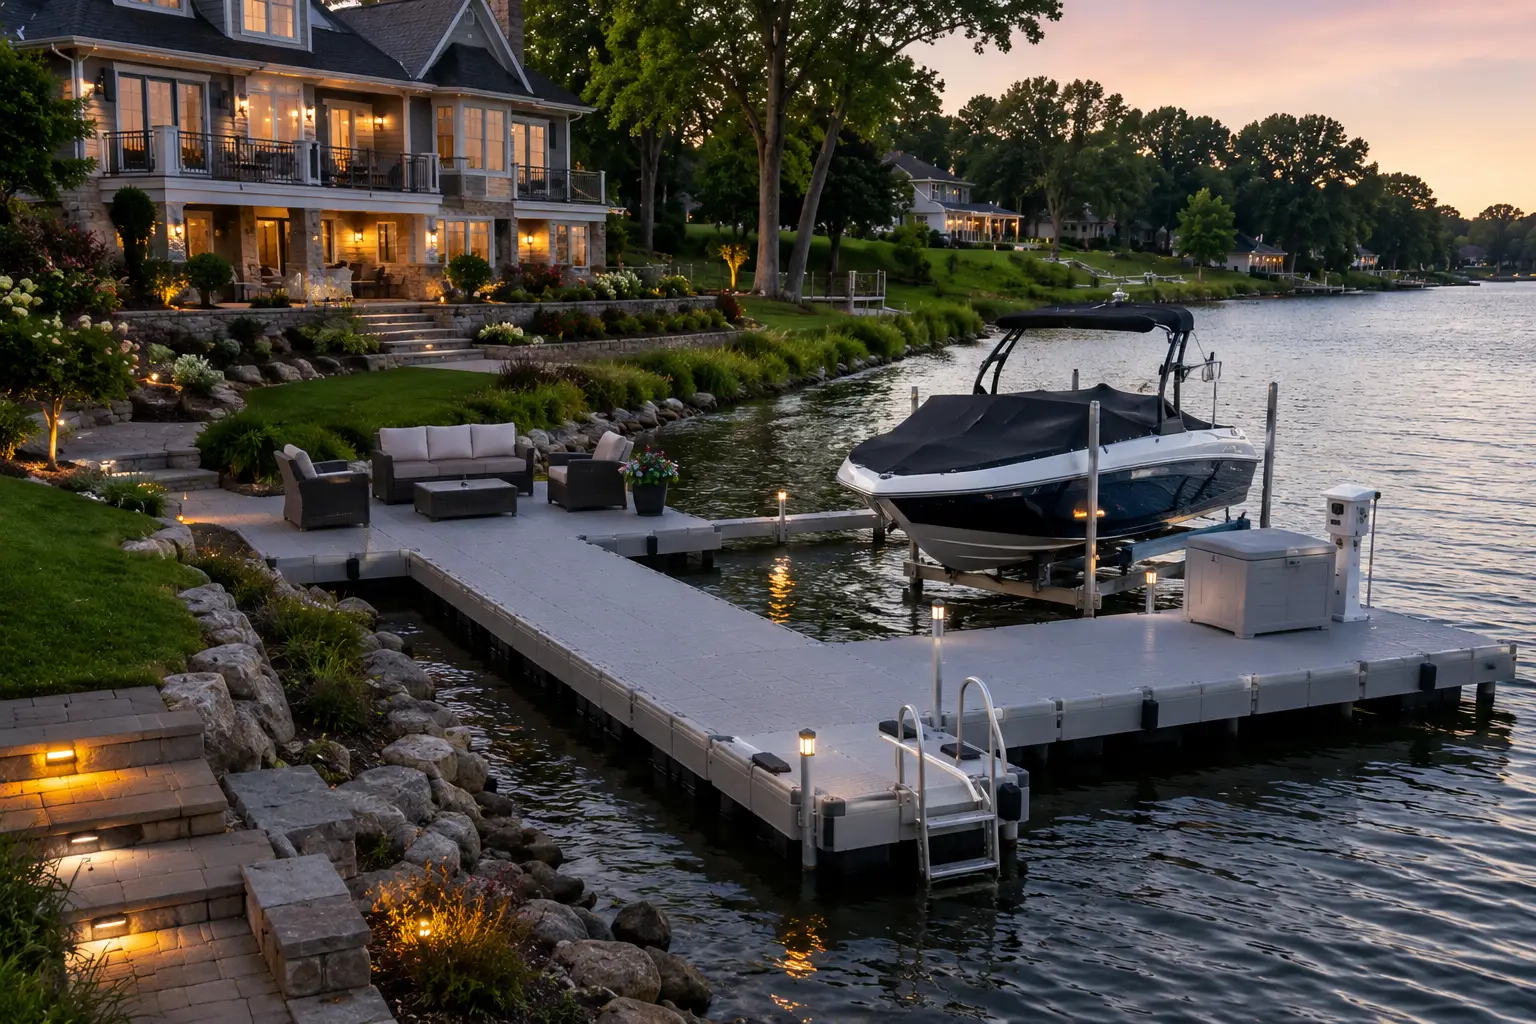
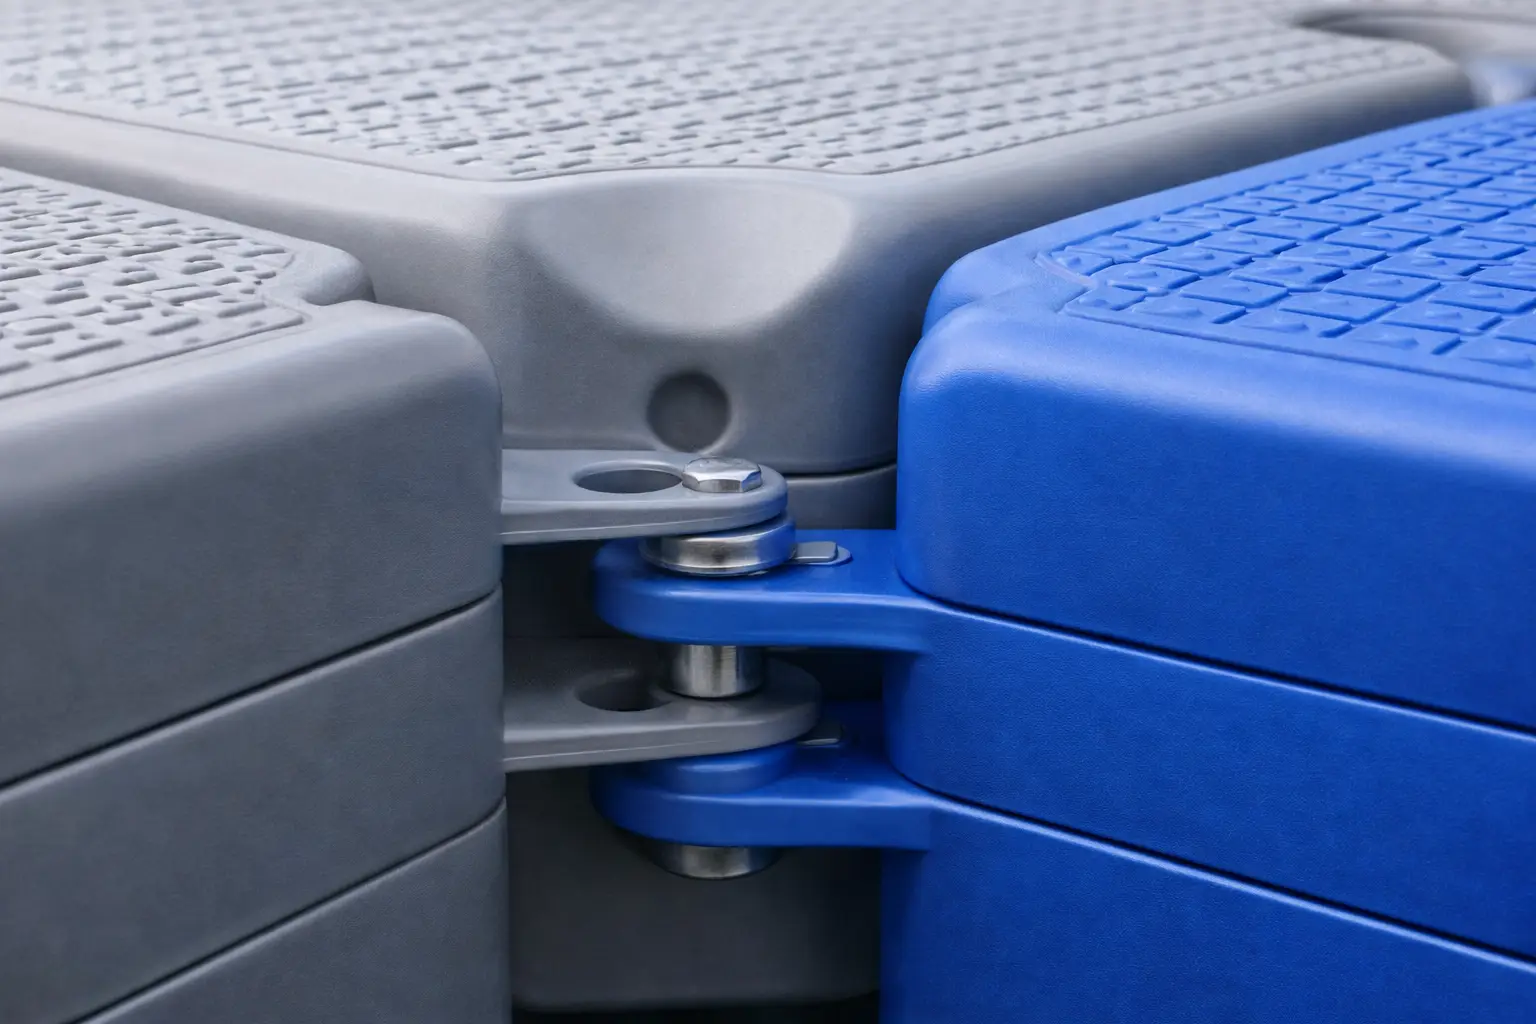
แพลตฟอร์มลอยน้ำของคุณต้องถูกผูกยึดกับฝั่งอย่างปลอดภัย ซึ่งต้องใช้ทางเดินขึ้นลง (ทางลาดแบบแข็งที่มีบานพับ) ที่ติดตั้งบานพับฝั่งท่าเรือแบบทนทานที่ด้านฝั่งดินและลูกกลิ้งโพลียูรีเทนที่ด้านท่าเรือลอยน้ำ วงจรกลไกนี้รองรับการเปลี่ยนแปลงระดับน้ำที่รุนแรง ทำให้ท่าเรือสามารถขึ้นและลงได้อย่างราบรื่นโดยไม่ก่อให้เกิดแรงเฉือนที่ทำลายโครงสร้างไม้
ต้นทุนตลอดอายุการใช้งาน 10 ปี: การบำรุงรักษาแบบดั้งเดิมเทียบกับนวัตกรรมที่ไม่ต้องการการบำรุงรักษา
ต้นทุนที่แท้จริงของท่าเรือไม้ไม่ใช่แค่ช่วงการก่อสร้างในเบื้องต้น—แต่เป็นการบำรุงรักษาอย่างต่อเนื่องยาวนานหลายทศวรรษ
กับดักการบำรุงรักษาประจำปีสำหรับท่าเทียบเรือไม้
ทุกปี คุณต้องทาเคลือบสีซึมผ่านกึ่งโปร่งแสง เปลี่ยนอุปกรณ์ที่เป็นสนิม และขูดสิ่งสกปรกทางชีวภาพใต้น้ำออกด้วยตนเอง
| ปัจจัยด้านต้นทุน (ประมาณสำหรับขนาด 8x12 ฟุต) | ท่าเทียบเรือไม้แบบดั้งเดิม DIY | ระบบโมดูลาร์ HDPE |
|---|---|---|
| ปีที่ 1: การก่อสร้างเบื้องต้นและวัสดุ | ~$1,800 – $2,500 | ~1,000 – 1,500 (ค่าธรรมเนียมครั้งเดียว) |
| ปีที่ 5: ต้นทุนสะสม (คราบ, แรงงาน, ชิ้นส่วน) | ~$3,000 – $4,200 | ประมาณ 1,TP4,000 – 1,TP4,3,500 (ไม่รวมค่าบำรุงรักษา) |
| ปีที่ 10: ต้นทุนสะสม (การซ่อมแซมใหญ่/การผุกร่อน) | ~$5,500+ | ~$2,800 – $3,500 |
| จุดคุ้มทุนทางการเงิน | ยังคงสูญเสียเงินอย่างต่อเนื่อง | ยอดขายในช่วงปีที่ 3 ถึง 4 |
*การประมาณการค่าใช้จ่ายขึ้นอยู่กับราคาขายปลีกเฉลี่ยของไม้ที่ผ่านการบำบัดสำหรับงานทางทะเลเกรด UC4B, ฮาร์ดแวร์สแตนเลส 316 และไม่รวมค่าแรงสำหรับงาน DIY
เส้นทางหนีภัยเชิงพาณิชย์: ระบบโมดูลาร์ HDPE
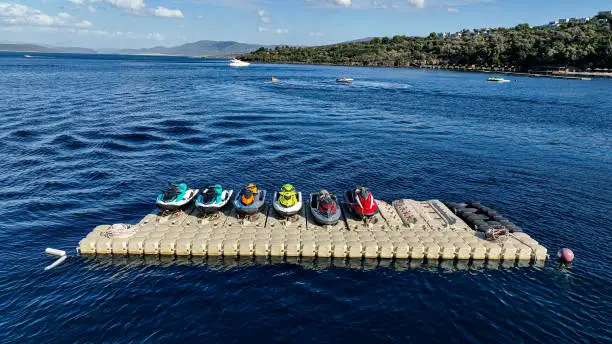
สำหรับผู้ที่ให้ความสำคัญกับเวลาของตน เงินลงทุนเชิงพาณิชย์ที่ชาญฉลาดมุ่งไปที่ระบบโมดูลาร์ HDPE ที่มีน้ำหนักโมเลกุลสูง ซึ่งผ่านการทดสอบในสภาพแวดล้อมที่มีคลื่นสูงและสามารถทนต่อแรงลมด้านข้างรุนแรงและแรงกดดันจากน้ำแข็งโดยไม่เกิดการเสียรูปโครงสร้าง Hiseadock นำเสนอแนวคิดที่แตกต่างอย่างสิ้นเชิง
ได้รับการรับรองโดย ISO-9001, CE, SGS และ TUVแพลตฟอร์มที่เป็นมิตรต่อสิ่งแวดล้อมเหล่านี้มีความทนทานสูงต่อการเปลี่ยนแปลงสภาพภูมิอากาศที่รุนแรง (-60°C ถึง 80°C) การประกอบไม่ต้องใช้เครื่องมือไฟฟ้า—เชื่อมต่อกันเหมือนอิฐขนาดใหญ่ที่ล็อคเข้าด้วยกัน มาพร้อมการรับประกัน 5 ปี และจัดส่งในขนาดกะทัดรัดภายในไม่กี่วัน เป็นโซลูชัน "ติดตั้งแล้วลืม" ที่สมบูรณ์แบบที่สุด
พร้อมที่จะเริ่มโครงการของคุณหรือยัง? เลือกเส้นทางของคุณ
ไม่ว่าคุณจะเป็นช่างไม้ฝีมือเยี่ยมที่สร้างงานจากศูนย์ หรือใครก็ตามที่ต้องการลงน้ำในสุดสัปดาห์นี้ เรามีวัสดุระดับมืออาชีพที่คุณต้องการ
เส้นทาง A: ผู้สร้างแบบ DIY
เก็บกรอบไม้ของคุณไว้ แต่ให้อัพเกรดเป็นระบบลอยตัวเกรดเชิงพาณิชย์ ทิ้งถังไม้และสร้างบนฐานรากที่มั่นคง
ช้อปทุ่นลอยน้ำสำหรับงานหนักเส้นทาง B: นักลงทุนที่ชาญฉลาด
ข้ามงานไม้ไปเลย ซื้อระบบโมดูลาร์ 100% ที่ไม่ต้องบำรุงรักษา ติดตั้งเสร็จภายในไม่กี่ชั่วโมง
สำรวจระบบโมดูลาร์